![]()
WebSphere Commerce V6
Hands-on Training for Administrators
Additional Lab Exercises
Mark Ho
IBM Software Services
for WebSphere
Scale up using Network Deployment is described in the WebSphere Commerce InfoCenter:
Here are links to three IBM Redbooks which cover different aspects of WAS V6 Network Deployment:
WAS 6 system management
http://www.redbooks.ibm.com/abstracts/sg246451.html?Open
WAS 6
scalability and performance
http://www.redbooks.ibm.com/abstracts/sg246392.html?Open
WAS 6
high availability
http://www.redbooks.ibm.com/abstracts/sg246688.html?Open
Use the
backupConfig.bat utility to archive the WebSphere configuration repository
(config subdirectory under the existing demo profile). Alternatively, if there is sufficient disk
space, simply create a zip archive of the entire demo directory.
- cd \IBM\WebSphere\AppServer\profiles\demo\bin
- backupConfig.bat standalone_demo.zip
This creates a zip file of the config directory. Unless a full path was given, the file will be written to the current directory from which the utility was executed. If there were application servers running, they will be stopped, unless the –nostop parameter is specified.
1.2. Creating additional profiles
Add a Deployment Manager profile to control the existing demo profile where WebSphere Commerce is running.
- Start the Profile Creation
Wizard:
cd \IBM\WebSphere\AppServer\bin\ProfileCreator
Run pctWindows.exe - On the Welcome panel,
click Next.
- Choose to create a
deployment manager profile, and click Next.
- Use the default name of
Dmgr01, and click Next. We
will leave the existing profile (demo) as the default profile on this
machine.
- Leave the default profile
directory, and click Next.
- Leave the default cell, node,
and host names (ensure the hostname is fully qualified), and click Next.
- Record the administrative
console port (_________) and the SOAP connector port (_________). Leave the default port assignments, and
click Next.
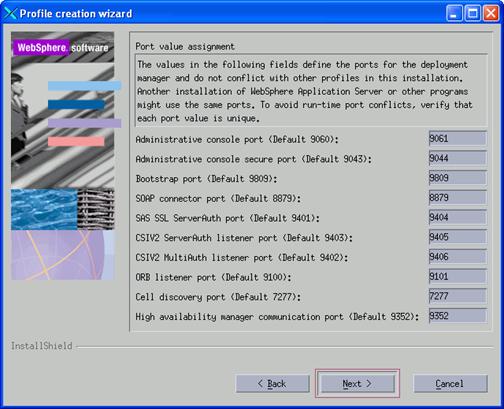
- On the Summary panel,
click Next.
- After successful profile
creation, click Finish to launch the First Steps panel.
- Click Installation Verification.
- Wait for the Application
Server to start up, and ensure that the IVT verification completes
successfully. Close the First Steps
output window.
- Click Exit on the First Steps panel.
Federating a standalone node (profile) brings that node
under the control of the Deployment Manager.
The WAS administration console for each node (e.g. listening on port
9061 for demo) will no longer work, and you will instead need to access the WAS
administration console of the Deployment Manager (recorded above).
The Deployment Manager GUI will have more panels and
options than the standalone WAS administration console. There is another major change introduced by
Network Deployment – the XML configuration for a node is transferred to a
master repository on the Deployment Manager.
Every node in the cell will have a local copy of the master
repository. Changes to the configuration
of one node will need to be propagated to all the rest. This will be seen by “synchronize changes
with nodes” checkboxes and other similar processes.
- Ensure that the Deployment
Manager process is started. This is
controlled by the startManager.bat and stopManager.bat scripts in the
<WAS>\profiles\Dmgr01\bin directory.
- The WebSphere Commerce
application (EAR) is quite large, and requires a larger Java heap size
than the default value during the federation process.
- Access the
administration console on the port recorded above:
http://<hostname>:port/admin - Expand System
Administration > Deployment Manager > Java and Process Management
> Process Definition > Java Virtual Machine.
- Change the
Maximum Heap Size value to 1024. You
can reduce this number once you have completed the federation process.
- Click OK and
save the configuration, and then restart the Deployment Manager.
- The various scripts under
each profile directory simply call the common version in the
<WAS>\bin directory, with profile specific environment
variables. Therefore it is
necessary to edit the common version.
- Make a backup
copy of the <WAS>\bin\addNode.bat script.
- Open the
addNode.bat script in an editor, and find the line which begins with the
following text:
"%JAVA_HOME%\bin\java" %WAS_DEBUG% %WAS_TRACE%
..... - Insert the
following parameters between the "-DWAS_HOME=%WAS_HOME%" and
"com.ibm.ws.bootstrap.WSLauncher" entries:
“-Xms256m –Xmx1024m” - Save the updated
file.
- To add a node to the cell,
run the addNode.bat script in each individual node’s
<WAS>\profiles\<profile_name>\bin directory, pointing it to
the deployment manager SOAP port.
The corresponding removeNode.bat script is used to un-federate a
node, and restore the standalone configuration.
Usage: addNode dmgr_host [dmgr_port] [-conntype <type>] [-includeapps]
[-includebuses] [-startingport <portnumber>] [-portprops
<qualified-filename>] [-nodeagentshortname <name>] [-nodegroupname
<name>] [-registerservice] [-serviceusername <name>]
[-servicepassword <password>] [-coregroupname <name>] [-noagent]
[-statusport <port>] [-quiet] [-nowait] [-logfile <filename>]
[-replacelog] [-trace] [-username <uid>] [-password <pwd>]
[-profileName <profile>] [-help]
The port number used should be the SOAP connector port (recorded above) of the Deployment Manager (which in our environment, resides on the local host). If “-conntype RMI” is specified, then the port should be the bootstrap port of the Deployment Manager.
Since there are already applications deployed in the demo profile, we must specify “-includeapps” to transfer these to the deployment manager (it may take a few minutes to complete).
addNode.bat <hostname> <SOAP port> -includeapps
Federating a node also results in a Node Agent process (another Java process) being created and started on the node. The node agent is what allows Deployment Manager to control the node, and is started and stopped manually by the startNode.bat and stopNode.bat scripts. Section 3.4 of the High Availability Solutions Redbook describes how to make the node agent and deployment manager processes run as Windows services.
- Open the WAS
Administration Console (on the Deployment Manager port, since the original
console for demo on port 9061 is no longer active). Look at the list of nodes in the cell
(System Administration -> Nodes).
There are now two nodes present in the cell, including the
Deployment Manager itself (xxxCellManager01). The full cell topology, including
servers which are present, can also be viewed (System Administration ->
Cell -> click on Local Topology tab).
- Since we are federating a
profile that already contains a WebSphere Commerce instance, we must
recreate the cell level configuration (from the standalone profile) on the
deployment manager node. This includes all the virtual host aliases, as
well as the webserver1 definition. To
recreate these documents, run the following command (from the <WC_installdir>\bin
directory):
config_ant.bat -DinstanceName=<instance_name> ReconfigureCell
- The cell managed by the
Deployment Manager has a different name than the standalone “cell” for the
demo profile. The plugin-cfg.xml
file generated for the Web server plugin will also have moved. It is necessary to edit the httpd.conf
for the IBM HTTP Server process used by WebSphere Commerce (in the
<WC>\instances\demo\httpconf directory, and NOT the default sample
httpd.conf file in <IHS>\conf).
The directive which loads the plugin-cfg.xml file must be corrected
to use the new path.
- Verify that the server1
application server and Web server can both be started and stopped from
within the Deployment Manager administration console.
The latest recommended fixes are listed here:
http://www.ibm.com/support/docview.wss?rs=180&uid=swg27004980
The custom WAS CD image from the WebSphere Commerce package is at the V6.0.2 Fix Pack 5 level. Applying the latest Fix Pack (FP17, released in December 2006) will bring this level to 6.0.2.17. There is an update to the Java runtime as well, for Daylight Savings Time rule changes in March 2007 (http://www.ibm.com/support/docview.wss?rs=180&uid=swg21219396).
There is a known defect in Fix Pack 17, affecting Enhanced EAR files (not used by WebSphere Commerce). APAR PK37272 is the required fix (http://www.ibm.com/support/docview.wss?uid=swg24014804). To address a possible OutOfMemory issue with Dynacache, APAR PK38811 needs to be requested from IBM WebSphere Support (http://www.ibm.com/support/docview.wss?uid=swg21254698).
The IBM HTTP Server and WAS Plugin components are updated independently, within their respective install directories. Interestingly, the WebSphere Commerce installer does not update the Plugin component to the same 6.0.2.5 level as the WAS runtime. It will be necessary to apply the 6.0.2 Refresh Pack for the Plugin, before a current Fix Pack may be applied. The Update Installer uses the WAS Java runtime from IBM, which requires sourcing the environment variables (specifically JAVA_HOME) from <WAS>\bin\setupCmdLine.bat before executing the update installer program.
If active profiles exist, they will also be upgraded by the Fix Pack, so backups of the XML configuration files (using backupConfig) should be made prior to applying any updates.
To track the status of updates to various components, see the logs\update directory for each component. The WAS base code and Plugin components also have a versionInfo.bat script (in the bin subdirectory) to report the current active software levels. For IBM HTTP Server, either check the version.signature file, or run apache –V.
Requirements:
- WebSphere Application Server Fix Pack 6.0.2.17 (http://www.ibm.com/support/docview.wss?rs=180&uid=swg24014309)
- Java SDK 1.4.2 SR6 or later (http://www.ibm.com/support/docview.wss?uid=swg24011133)
- IBM
HTTP Server Fix Pack 6.0.2.15
(same URL as FP 17) - WebSphere
Plugin Refresh Pack 6.0.2
(http://www.ibm.com/support/docview.wss?rs=180&uid=swg24009813) - WebSphere
Plugin Fix Pack 6.0.2.17
(same URL as FP 17)
2.1.1. Apply Java SDK patch
- Extract the 6.0.2-WS-WASJavaSDK-WinX32-FP00000017.zip
file to the <WAS> install directory.
It should create an updateinstaller subdirectory there.
- Set up the environment variables
required by WAS (specifically the JAVA_HOME) by running setupCmdLine.bat.
- Start the update installer from the
updateinstaller subdirectory:
update - On the Welcome page, click Next.
- The current install location of <WAS> should be detected automatically. Click Next.
- Select Install maintenance package and click Next.
- The 6.0.2-WS-WASJavaSDK-WinX32-FP00000017.pak Java SDK update file (in the maintenance subdirectory) is automatically selected. Click Next.
- A message will appear stating that the Java VM which the update wizard is currently using must be updated, after which, the installer will be re-started. Click Next.
- Click Relaunch to re-start the update wizard with the copied Java SDK.
- Select Install maintenance package and click Next.
- The Java SDK update file is again automatically selected. Click Next.
- Review the changes and updates to be performed and click Next to begin.
- The process should take about 5 minutes. Ensure that no errors were reported, then click Finish, to exit the installer.
2.1.2. Apply Fix Pack 17
- Delete the updateinstaller subdirectory containing the Java SDK Update.
- Extract the 6.0.2-WS-WAS-WinX32-FP00000017.zip file to the <WAS> install directory. It should re-create a new updateinstaller subdirectory there.
- Start
the update installer from the updateinstaller subdirectory:
update - On the Welcome page, click Next.
- The current install location of <WAS> should be detected automatically. Click Next.
- Select Install maintenance package and click Next.
- The 6.0.2-WS-WAS-WinX32-FP00000017.pak Fix Pack update file (in the maintenance subdirectory) is automatically selected. Click Next.
- Review the changes and updates to be performed and click Next to begin.
- The process should take about 20 minutes. Ensure that no errors were reported, then click Finish, to exit the installer.
2.2.1. Apply Refresh Pack 2
- Extract the 6.0-WS-WASPlugIn-WinX32-RP0000002.zip Refresh Pack 2 file to \WebSphere\Plugins (note that this is the plugin install directory, and not the one used by WAS). This will create the updateinstaller subdirectory there.
- Start
the update installer for the plugin:
update - On the Welcome page, click Next.
- The current install location of \WebSphere\Plugins should be detected automatically. Click Next.
- Select Install maintenance package and click Next.
- The 6.0-WS-WASPlugIn-WinX32-RP0000002.pak Refresh Pack update file (in the maintenance subdirectory) is automatically selected. Click Next.
- A message will appear stating that the Java VM which the update wizard is currently using must be updated, after which, the installer will be re-started. Click Next.
- Click Relaunch to re-start the update wizard with the copied Java SDK.
- Select Install maintenance package and click Next.
- The Refresh Pack update file is again automatically selected. Click Next.
- Review the changes and updates to be performed and click Next to begin.
- Ensure that no errors were reported, then click Finish, to exit the installer.
2.2.2. Apply Fix Pack 17
- Delete the updateinstaller subdirectory containing the Refresh Pack Update.
- Extract the 6.0.2-WS-WASPlugIn-WinX32-FP00000017.zip file to \WebSphere\Plugins (note that this is the plugin install directory, and not the one used by WAS). This will create the updateinstaller subdirectory there.
- Start
the update installer for the plugin:
update - On the Welcome page, click Next.
- The current install location of \WebSphere\Plugins should be detected automatically. Click Next.
- Select Install maintenance package and click Next.
- The 6.0.2-WS-WASPlugIn-WinX32-FP00000017.pak file (in the maintenance subdirectory) is automatically selected. Click Next.
- Review the changes and updates to be performed and click Next to begin.
- Ensure that no errors were reported, then click Finish, to exit the installer.
- Extract the 6.0.2-WS-WASIHS-WinX32-FP00000015.zip to <IHS> (note that this is the IHS install directory, and not the one used by WAS). This will create an updateinstaller subdirectory there.
- Start
the update installer for IHS:
update - On the Welcome page, click Next.
- The current install location of IHS should be detected automatically. Click Next.
- Select Install maintenance package and click Next.
- The 6.0.2-WS-WASIHS-WinX32-FP00000015.pak file (in the maintenance subdirectory) is automatically selected. Click Next.
- Review the changes and updates to be performed and click Next to begin.
- Ensure that no errors were reported, then click Finish, to exit the installer.
The latest recommended fixes are listed here:
http://www.ibm.com/support/docview.wss?rs=3046&uid=swg27007361
There are two separate
tasks in applying a WebSphere Commerce Fix Pack. The main one is to update the WebSphere
Commerce product code which was installed on the first or primary server in the
environment. Then it is necessary to
update any instances which may have been deployed. Any future instances which will be created
using the updated product code will already incorporate the new Fix Pack.
The current Fix Pack
level for the installed product code is recorded in the COMMERCE.product file
in the <WCS>/properties/version directory. For any deployed WebSphere Commerce instance
(EAR) there is a similar file in <WC_EAR>/properties/version, under the
installedApps directory for the WAS profile that is used by the instance. The database schema level for a WebSphere
Commerce instance is stored in the SITE table.
Both the EAR and database levels are displayed in the SystemOut.log file
when the Commerce application is initializing.
Requirements:
- WebSphere
Commerce Server Fix Pack 6.0.0.1
(http://www.ibm.com/support/docview.wss?rs=3046&uid=swg24013056) - WebSphere
Commerce Update Installer 6.1
(http://www.ibm.com/support/docview.wss?uid=swg24013502) - WebSphere
Commerce Fix Pack Installation Guide
(same URL as Fix Pack)
3.1. Updating WebSphere Commerce installed code
- Extract the updii.6103.windows.ia32.zip file to a temporary directory. This is the installation image for the WebSphere Commerce Update Installer.
- There should be an UpdateInstaller subdirectory in the temporary location. Run install.exe from there.
- On the Welcome page, click Next.
- Accept the license agreement and click Next.
- If system pre-requisites are met, click Next.